Over the past almost year, I have been Henndigo-ing about every other month or so. At first, I used to try to cover my newly greying hairline every month. My hair is quite dark so the greys tend to show more starkly than if my hair was a lighter shade. I am a bit lazy so to upkeep it every single monthly became a bit cumbersome so every other month has now become my happy medium.
Over time, I have simplified my Henndigo recipe. I experimented a bit with oils, yogurt, coconut milk, acids, different types of henna, and different types of Indigo. I found that I am quite happy with the quality that Henna Sooq offers. Yes, it is more expensive, particularly when you factor in shipping, but the results are so much better and much more reliable.
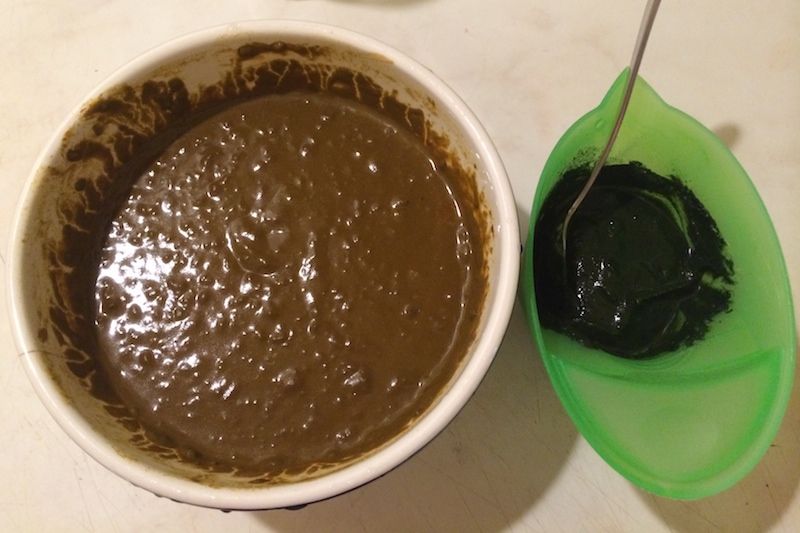
I first mix my Hennas (Rajasthani and Red Raj) and allow for 4-5 hours of dye release. I now just mix it with some steeped hot tea. Basically, any tea I have on hand that has a red tinge to it. I have found that a modest amount of Coconut Milk leaves my hair nourished, soft, shinny and makes the Henndigo mix a lot creamier and easy to work with and to rinse out.
From previous research, the standard recommendation is 250 grams for waist length hair, but since my hair is fine, I use 160 grams for my waist length hair, and usually have some leftover paste that I end up freezing.
Since Indigo needs to be made fresh prior to use, I mix it 10 minutes before I am ready to use it. I mix it with sea salt and hot (not boiling) water only. I allow the Indigo to sit for 10 minutes to dye release, and then I carefully mix it into my Henna paste until the mix turns a dark pea green and has no streaks of red in it:
Henna Sooq Rajasthani Henna 96 g (3/4 cup)
Red Raj Henna 32 g (1/4 cup)
16 oz Strongly brewed hot Raspberry tea
¼ can Coconut Milk
Indigo 32 g (1/4 cup)
2 tsp Sea Salt (for Indigo)
_________________
- Mix hennas and tea
- Leave to dye release in bowl covered in plastic for 4 hours. Afterwards add coconut milk to henna mix
- Mix Indigo with warm water only. Add salt and mix some more. Let sit for 5 minutes.
- Mix Indigo paste into Henna paste (mix really well)
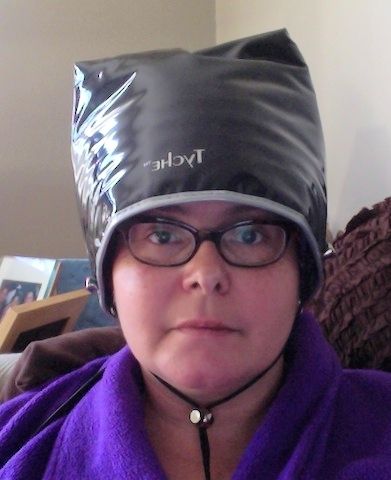
- Apply to damp hair and put on a plastic shower cap. Place woolen cap over shower cap
- Leave on for at least 5 hours and then wash out
- Do not wash again for 48 hrs
________________
Leftover Henna can be stored in freezer for years. Leftover Indigo needs to be in an airtight baggy in a cool, dry, and dark place and can be stored for 6 months.
I like to apply my paste to dry hair. Wet hair, even when it's not dripping wet, makes the mix run. It's bad enough to sit around for 4-5 hours with a muddy paste on top of your head, your head wrapped in plastic, a wool beanie, and a heating cap on. But, when there are multiple drips running down your face and neck, it's quite unbearable. I will admit that damp hair makes spreading the paste a smoother process, but I also don't like working with hair that can be more easily damaged if I become impatient and try to rush things.
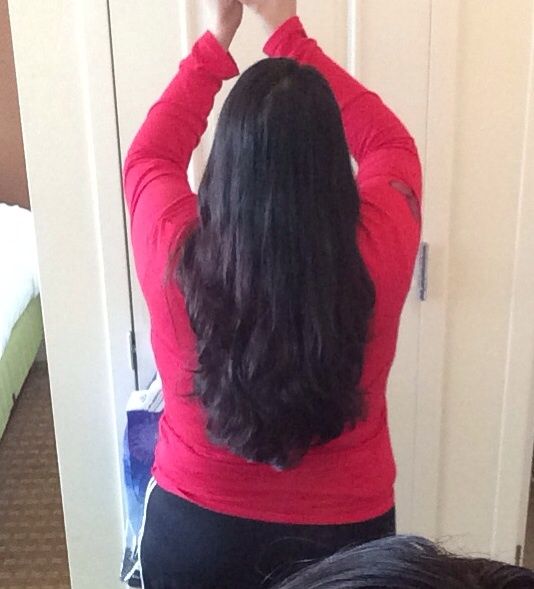
By now, I don't get paste all over the bathroom like I used to when I first started. Now, it just mostly gets on the counter top and myself. Having now have almost a full year's of experience, Henndigo-ing, I do plan to continue using it. I love the dark plum color the mix yields that eventually settles into dark brown. It also allows me to continue to grow and/or maintain my hair at this length without damaging it with chemical dyes. I guess I am also a bit more adventurous since I don't mind the fact that the results are not always exactly the same. I like the variability and element of surprise.
Good luck to you all Henndigo Heads. I think that it's really not as complicated as most people make it out to be, but it does take some flexibility and just learning to accept that it is a natural plant based product so every single variable cannot always be controlled at will.
This is my final result:

Over time, I have simplified my Henndigo recipe. I experimented a bit with oils, yogurt, coconut milk, acids, different types of henna, and different types of Indigo. I found that I am quite happy with the quality that Henna Sooq offers. Yes, it is more expensive, particularly when you factor in shipping, but the results are so much better and much more reliable.
I first mix my Hennas (Rajasthani and Red Raj) and allow for 4-5 hours of dye release. I now just mix it with some steeped hot tea. Basically, any tea I have on hand that has a red tinge to it. I have found that a modest amount of Coconut Milk leaves my hair nourished, soft, shinny and makes the Henndigo mix a lot creamier and easy to work with and to rinse out.
From previous research, the standard recommendation is 250 grams for waist length hair, but since my hair is fine, I use 160 grams for my waist length hair, and usually have some leftover paste that I end up freezing.
Since Indigo needs to be made fresh prior to use, I mix it 10 minutes before I am ready to use it. I mix it with sea salt and hot (not boiling) water only. I allow the Indigo to sit for 10 minutes to dye release, and then I carefully mix it into my Henna paste until the mix turns a dark pea green and has no streaks of red in it:
Henna Sooq Rajasthani Henna 96 g (3/4 cup)
Red Raj Henna 32 g (1/4 cup)
16 oz Strongly brewed hot Raspberry tea
¼ can Coconut Milk
Indigo 32 g (1/4 cup)
2 tsp Sea Salt (for Indigo)
_________________
- Mix hennas and tea
- Leave to dye release in bowl covered in plastic for 4 hours. Afterwards add coconut milk to henna mix
- Mix Indigo with warm water only. Add salt and mix some more. Let sit for 5 minutes.
- Mix Indigo paste into Henna paste (mix really well)
- Apply to damp hair and put on a plastic shower cap. Place woolen cap over shower cap
- Leave on for at least 5 hours and then wash out
- Do not wash again for 48 hrs
________________
Leftover Henna can be stored in freezer for years. Leftover Indigo needs to be in an airtight baggy in a cool, dry, and dark place and can be stored for 6 months.
I like to apply my paste to dry hair. Wet hair, even when it's not dripping wet, makes the mix run. It's bad enough to sit around for 4-5 hours with a muddy paste on top of your head, your head wrapped in plastic, a wool beanie, and a heating cap on. But, when there are multiple drips running down your face and neck, it's quite unbearable. I will admit that damp hair makes spreading the paste a smoother process, but I also don't like working with hair that can be more easily damaged if I become impatient and try to rush things.
By now, I don't get paste all over the bathroom like I used to when I first started. Now, it just mostly gets on the counter top and myself. Having now have almost a full year's of experience, Henndigo-ing, I do plan to continue using it. I love the dark plum color the mix yields that eventually settles into dark brown. It also allows me to continue to grow and/or maintain my hair at this length without damaging it with chemical dyes. I guess I am also a bit more adventurous since I don't mind the fact that the results are not always exactly the same. I like the variability and element of surprise.
Good luck to you all Henndigo Heads. I think that it's really not as complicated as most people make it out to be, but it does take some flexibility and just learning to accept that it is a natural plant based product so every single variable cannot always be controlled at will.
This is my final result: