I have been experimenting with Henndigo since last year. I began my journey with a rather complicated recipe. I experimented with adding citrus, yogurt, vinegar, cinnamon, among other things. What I did find is that coconut milk must stay in my mix. It is an amazing conditioner when used sparingly, but when over used; too much is just that...too much!
I also experimented with heat and found that it helped my hair absorb color much better. This is my newly perfected Henndigo recipe and process:
Henna Sooq Rajasthani Henna 96 g (3/4 cup)
Red Raj Henna 32 g (1/4 cup)
16 oz Strongly brewed hot Raspberry tea (although any herbal tea will work. I just prefer a red tea)
¼ can Coconut Milk
Organic Indigo 32 g (1/4 cup)
2 tsp Sea Salt (for Indigo)
_________________
- Mix hennas and tea. The paste should be the consistency of Greek yogurt.
- Leave to dye release in bowl covered in plastic for 4 hours. After dye release, add coconut milk to henna mix
- Mix Indigo with hot water only. Add salt and mix some more. Let sit for 5 minutes to release dye.
- Mix Indigo paste into Henna paste (mix really well)
- Apply to damp hair and put on a plastic shower cap. Place a woolen cap over a disposable plastic shower cap
- Leave on for at least 5 hours and then wash out (you can use a heat cap on medium for more intense color)
- Rinse out, condition, and do not wash again for 48 hrs
________________
Leftover Henna can be stored in freezer for years. Leftover Indigo needs to be in an airtight baggy in a cool, dry, and dark place and can be stored for 6 months.
So, it is no secret I get my Henna from Henna Sooq. The quality of their Henna and Indigo is really top notch and they advertise their Lawson content (the ingredient that tells you how much color will be released onto your hair). They have good customer service and have a consistent supply. Remember Henna/Indigo is imported and comes from a plant so it's not as if there is an unlimited supply at any given time. Henna/Indigo requires that you buy in quantities that will last you for several months. What is nice is that now if you order over $75, they ship it to you for free.
I usually prepare my Henna really late the night before or really early the same morning. Some people like to sleep with it on their head so the dye does its work overnight, but I can't fall asleep with a wet head wrapped in plastic. I am fully aware that I will have to let it sit for a number of hours before it's ready for use so I try to plan ahead. After it's ready, I mix my Indigo with really hot water:
Once both mixes are ready, the Indigo needs to be mixed really well into the Henna. I apply it immediately. Indigo is quite impatient and will not wait for you so it's important to mix it when you are ready to use it. I apply my Henndigo paste with rubber gloved hands. Some people like to use a bottle applicator or a plastic brush, but since my mix comes out like mud or a nice thick frosting, I like using my hands to spread it, and smooth it onto my hair. I like to apply to it to damp hair. As far as color, it doesn't matter if the hair is dry or dampened, but it is a lot messier when you have to apply it to dry hair. Make no mistake applying this paste to your hair will be messy. Your first time you will get it all over everything so cover any items you wish to protect.
After all the sections are saturated with paste, I bun my hair atop my head and put on my disposable shower cap. I then use Saran Wrap to cover my sideburns. Afterwards, I put on a wool cap and put on my glasses (with legs wrapped in cling film) so I don't have to see the world out of focus for the next 5 hours.
I then put on my heat cap on medium for the next 5 hours and catch up on some Netflix.
Once the 5 hours are up, I rinse the paste out of my hair until the water runs clear. This is another time when the coconut milk pays off. Not only is it an excellent conditioner, but it makes the Henndigo mix a lot smoother so it rinses easier. Since my hair is fine, I use a gentle non-SLS shampoo to get all of it out.
Once my hair is dry, it comes out a dark chocolate brown and it's so moisturized and thick. I will admit that I use Henndigo to mainly cover my greys. I have about 10% greys, but they choose to say hello right in the temple area for all to see. I use Henndigo every other month or so, but sometimes I have to do it every 6 weeks depending on how fast my hair grows.


I have heard a lot negatives about Indigo use from different sources. People complain that it fades too quickly, is unpredictable, dies out too quickly, etc. I just find that you have to understand Indigo so you can use it appropriately. Indigo like Henna is a stain that lays atop the hair shaft so it does not change the hair molecules like chemical dyes. The more you do it, the deeper the stain. My only word of caution is that if you are not ready to commit to something permanent, then keep away from Henna/Indigo because it is not going to wash or fade out completely.
General Tips for a Successful Henndigo Application
1) Outline your entire visible hairline with either petoleum jelly or a heavy oil before you begin or else any skin the paste touches will be orange for days.
2) After applying the paste, clean any areas with paste on them, yourself, countertops, tiles, floor, etc. immediately. The longer you let the paste sit, the more it will stain. Immediately after drying on skin, the mud-like paste flakes right off.
3) Henna has a very grassy earthy smell, you can use essential oils or apply scented oils like Monoi Oil to your hair after you rinse it out.
4) Application is much easier when hair is damp. You also tend to use less paste to saturate your hair than when it's dry.
I also experimented with heat and found that it helped my hair absorb color much better. This is my newly perfected Henndigo recipe and process:
Henna Sooq Rajasthani Henna 96 g (3/4 cup)
Red Raj Henna 32 g (1/4 cup)
16 oz Strongly brewed hot Raspberry tea (although any herbal tea will work. I just prefer a red tea)
¼ can Coconut Milk
Organic Indigo 32 g (1/4 cup)
2 tsp Sea Salt (for Indigo)
_________________
- Mix hennas and tea. The paste should be the consistency of Greek yogurt.
- Leave to dye release in bowl covered in plastic for 4 hours. After dye release, add coconut milk to henna mix
- Mix Indigo with hot water only. Add salt and mix some more. Let sit for 5 minutes to release dye.
- Mix Indigo paste into Henna paste (mix really well)
- Apply to damp hair and put on a plastic shower cap. Place a woolen cap over a disposable plastic shower cap
- Leave on for at least 5 hours and then wash out (you can use a heat cap on medium for more intense color)
- Rinse out, condition, and do not wash again for 48 hrs
________________
Leftover Henna can be stored in freezer for years. Leftover Indigo needs to be in an airtight baggy in a cool, dry, and dark place and can be stored for 6 months.
So, it is no secret I get my Henna from Henna Sooq. The quality of their Henna and Indigo is really top notch and they advertise their Lawson content (the ingredient that tells you how much color will be released onto your hair). They have good customer service and have a consistent supply. Remember Henna/Indigo is imported and comes from a plant so it's not as if there is an unlimited supply at any given time. Henna/Indigo requires that you buy in quantities that will last you for several months. What is nice is that now if you order over $75, they ship it to you for free.
I usually prepare my Henna really late the night before or really early the same morning. Some people like to sleep with it on their head so the dye does its work overnight, but I can't fall asleep with a wet head wrapped in plastic. I am fully aware that I will have to let it sit for a number of hours before it's ready for use so I try to plan ahead. After it's ready, I mix my Indigo with really hot water:
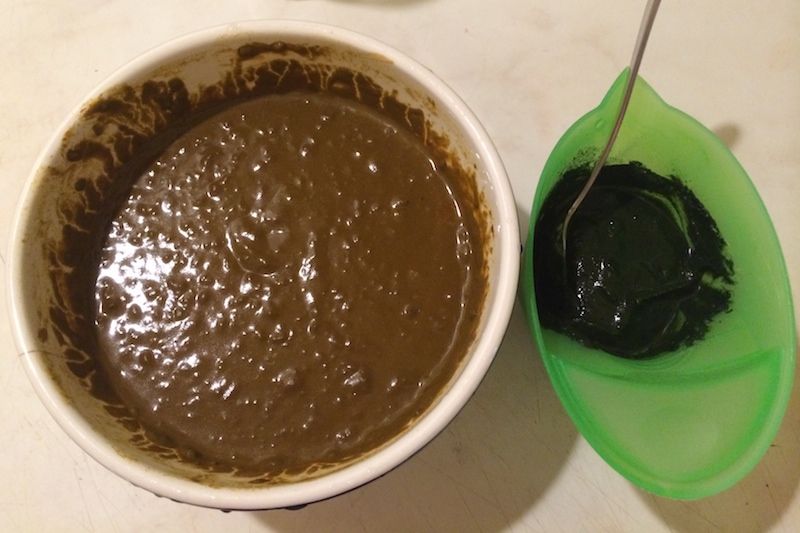 |
| Dye released Henna on the left an dye released Indigo on the right |
After all the sections are saturated with paste, I bun my hair atop my head and put on my disposable shower cap. I then use Saran Wrap to cover my sideburns. Afterwards, I put on a wool cap and put on my glasses (with legs wrapped in cling film) so I don't have to see the world out of focus for the next 5 hours.
 |
| Woolen Cap |
 |
| Heat Cap |
Once the 5 hours are up, I rinse the paste out of my hair until the water runs clear. This is another time when the coconut milk pays off. Not only is it an excellent conditioner, but it makes the Henndigo mix a lot smoother so it rinses easier. Since my hair is fine, I use a gentle non-SLS shampoo to get all of it out.
Once my hair is dry, it comes out a dark chocolate brown and it's so moisturized and thick. I will admit that I use Henndigo to mainly cover my greys. I have about 10% greys, but they choose to say hello right in the temple area for all to see. I use Henndigo every other month or so, but sometimes I have to do it every 6 weeks depending on how fast my hair grows.


I have heard a lot negatives about Indigo use from different sources. People complain that it fades too quickly, is unpredictable, dies out too quickly, etc. I just find that you have to understand Indigo so you can use it appropriately. Indigo like Henna is a stain that lays atop the hair shaft so it does not change the hair molecules like chemical dyes. The more you do it, the deeper the stain. My only word of caution is that if you are not ready to commit to something permanent, then keep away from Henna/Indigo because it is not going to wash or fade out completely.
General Tips for a Successful Henndigo Application
1) Outline your entire visible hairline with either petoleum jelly or a heavy oil before you begin or else any skin the paste touches will be orange for days.
2) After applying the paste, clean any areas with paste on them, yourself, countertops, tiles, floor, etc. immediately. The longer you let the paste sit, the more it will stain. Immediately after drying on skin, the mud-like paste flakes right off.
3) Henna has a very grassy earthy smell, you can use essential oils or apply scented oils like Monoi Oil to your hair after you rinse it out.
4) Application is much easier when hair is damp. You also tend to use less paste to saturate your hair than when it's dry.
No comments:
Post a Comment